October 2, 2012
Concepts
- A “Debugger” is a program that can attach itself to a JVM running your Java program in order to let you pause the execution of your program at specific points in your source code called “break points.” Once your program is paused, you can do many useful things. The two most useful things a Debugger lets you do are:
- See the value that variables actually have at run-time.
- “Step through” the execution of your code one line at a time.
- Together, these two features of Debuggers make it possible to see what your program is actually doing when it is running, which can be very useful in tracking down certain bugs.
- Debugging in Eclipse is very easy: Click the “Bug” icon
 to run your program with a debugger attached.
- Not very much interesting will happen unless you have set up some breakpoints. To add a breakpoint, double-click to the left of any line of code:

No Breakpoint
Double-click on line 142…

Breakpoint Added
Now, the Debugger will pause the program right before line 142 runs.
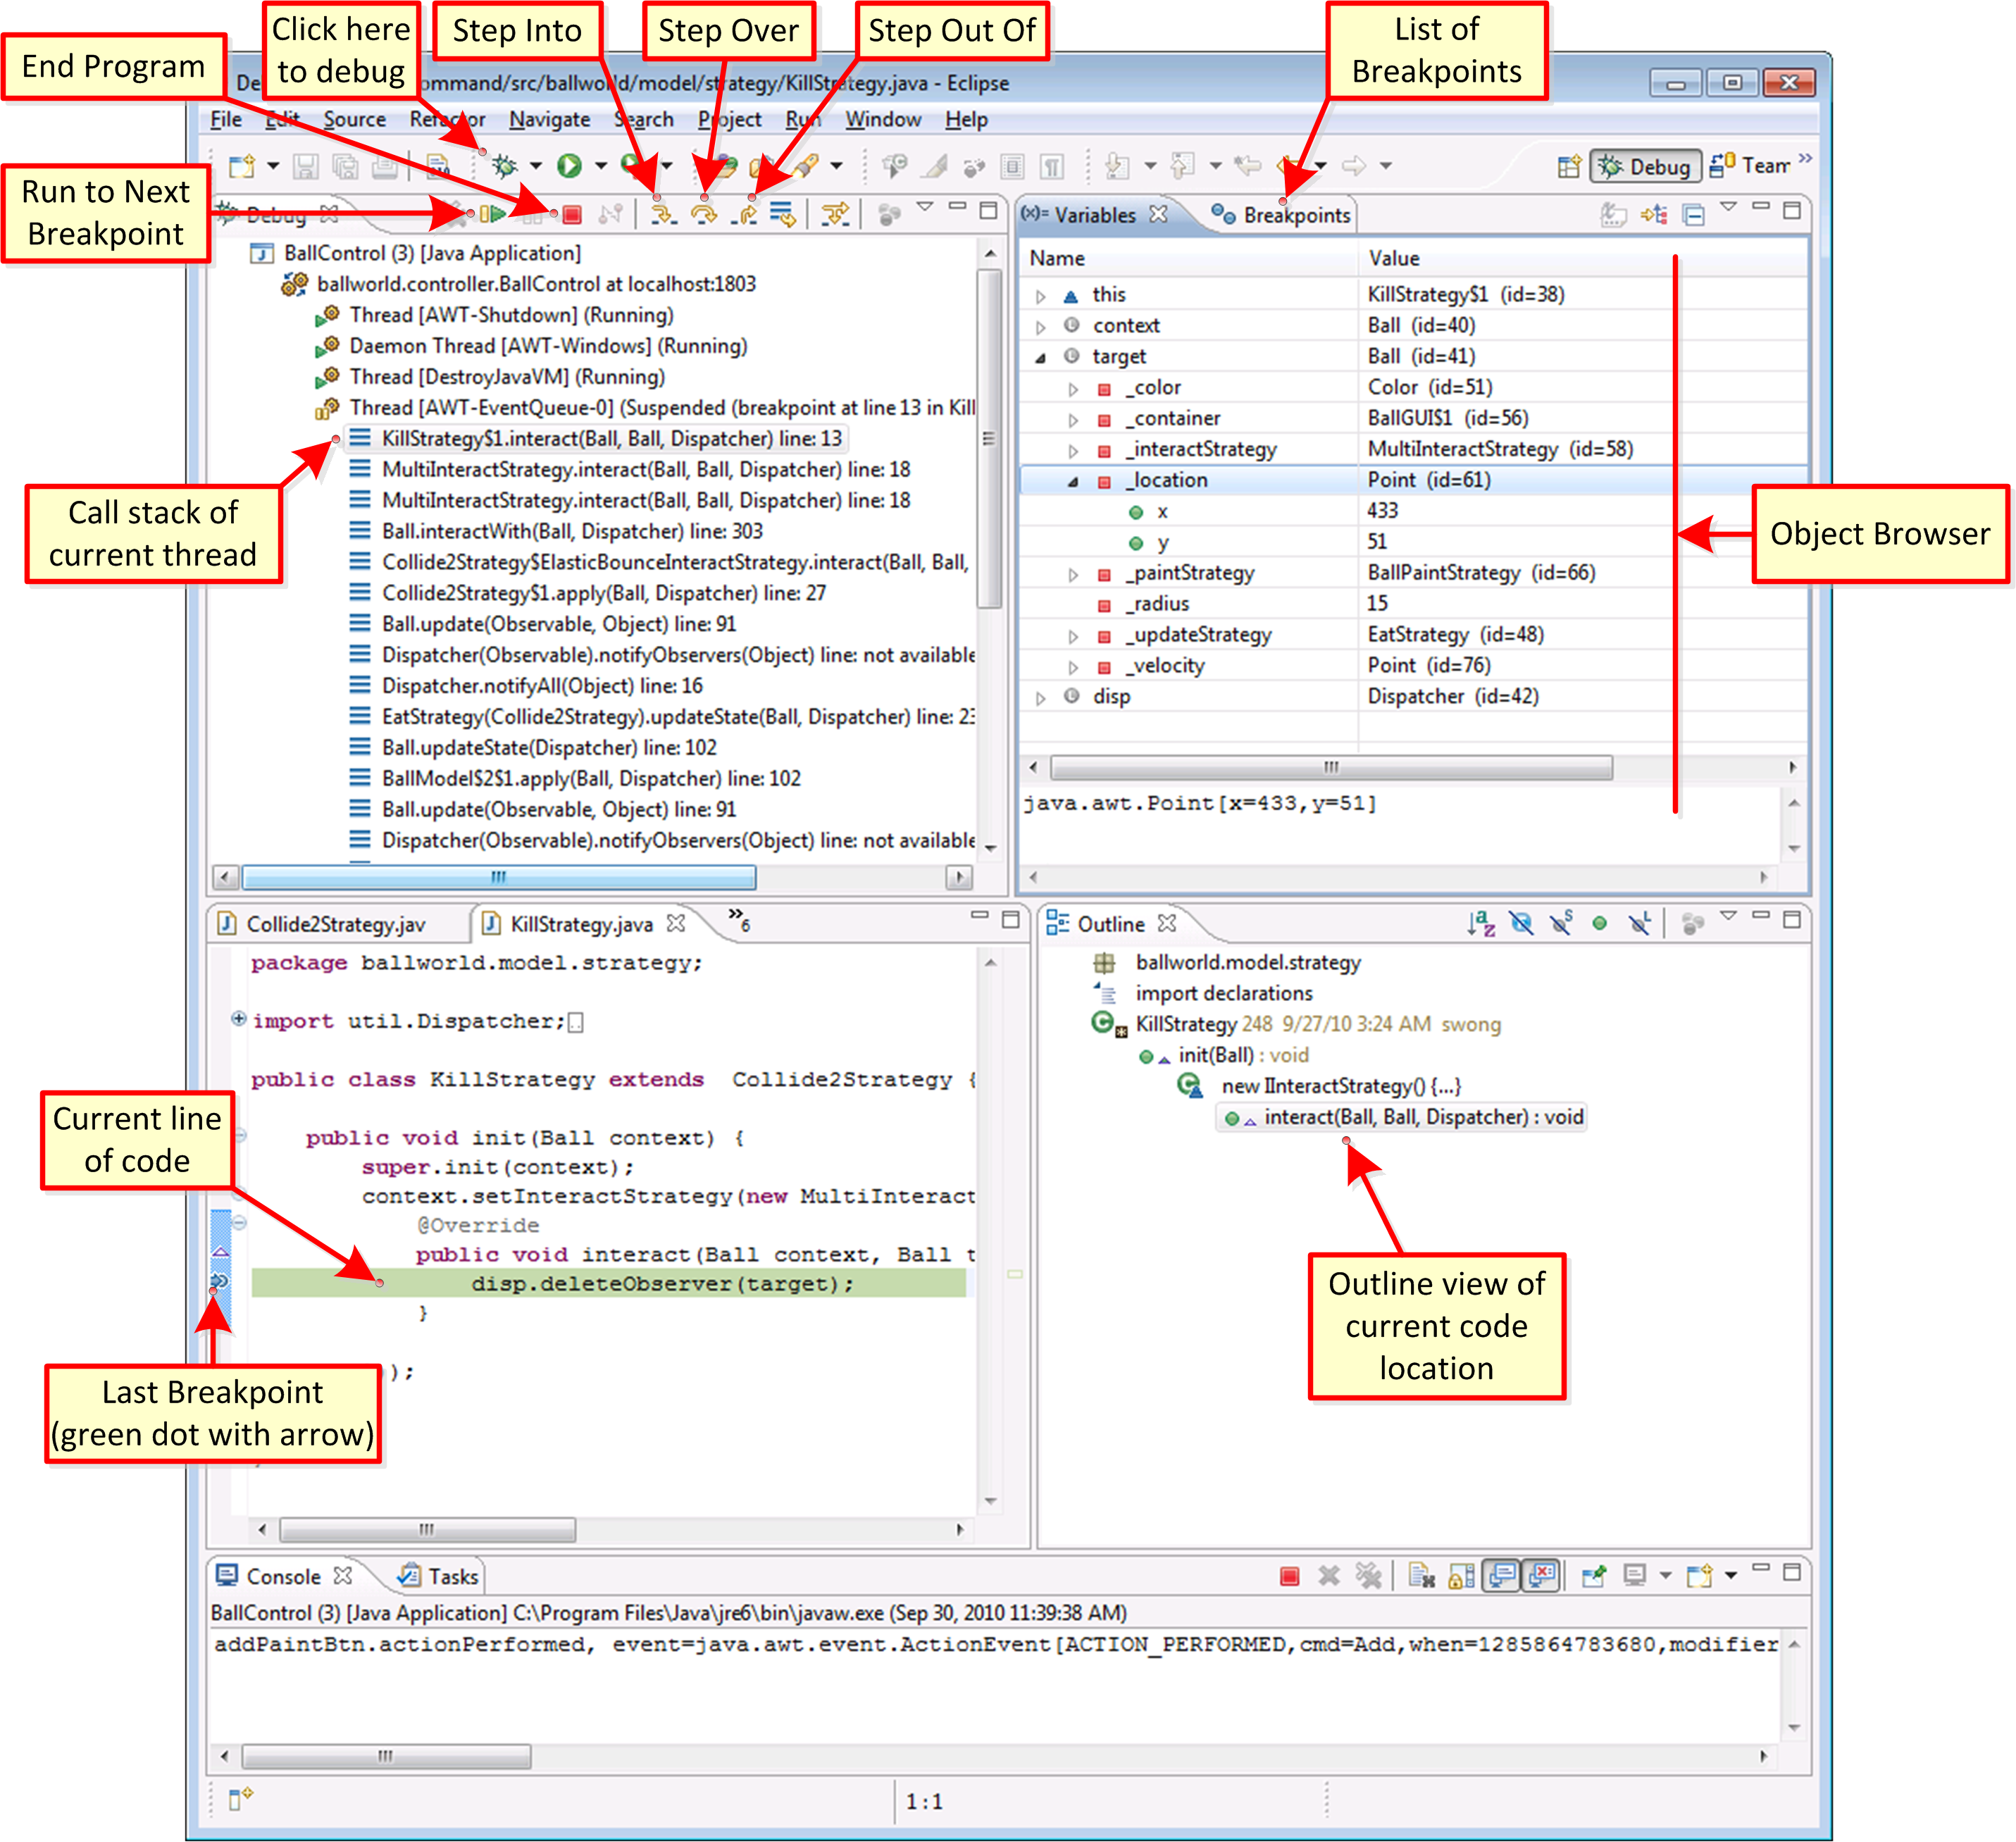
- When the Debugger pauses a program at a breakpoint, Eclipse will open the “Debug perspective,” and provide some controls to you
 “Step Over” will move to the next function call or line of code in the file that contained the breakpoint. In the example above, the FIRST “step over” will run until _default_strategy.make_strategy(). The SECOND “step over” will run all of the code in _default_strategy.make_strategy(), and pause still on line 142, ready to run new MotionSwitchStrategy(…). The THIRD “step over” will finish line 142’s new MotionSwitchStrategy, and pause at line 145. “Step Over” is the way to get to the line that you really care about.
 “Step Into” will run the very next line of code, wherever it may be. In the example above, the FIRST “Step Into” will also run until it finds _default_strategy.make_strategy(), as that is the very first thing that must happen on line 142. The SECOND “step into” will go to the file that defines whatever type of object _default_strategy is – in this case, it is an anonymous inner class created in the Controller, so we’ll be sitting at line 1 in the controller. The THIRD “step into” will go to the first line of the make_strategy() method. You could then use “step over” to walk through the lines of code in make_strategy(). “Step Into” is a good way to dig into the inner workings of the line of code you care about.
 “Step Return” will run through lines of code in whichever method you are currently in, until a “return” line is found. It will complete the return, and then pause again. In the example above, clicking “Step Return” anywhere inside the make_strategy() method will bring us back to line 143, where make_strategy() has just finished completing. “Step Return” is the quick way to get yourself out of a hole you dug yourself into with “Step Into.”
- When debugging, you can help yourself understand what is going on by only having one method call per line of code. Instead of the example code above, the following would be much easier to debug:

Easier to Debug
Resources
- Debugging in Eclipse: http://www.clear.rice.edu/comp310/Eclipse/debugging.html
- Screenshot of Eclipse’s “Debug Perspective:” http://www.clear.rice.edu/comp310/Eclipse/debug_screen_annotated.png
 Comments Off on Lab 06: Debugging in Eclipse |
  Labs | Tagged: breakpoint, debugger, step into, step over, step return |
  Permalink
 Posted by iwa1
September 18, 2012
This lab is really meant to assist with HW04, but due to scheduling, we’re doing it now. Dr. Wong suggests that you branch your HW02 or HW03 (depending on which is more complete) into Lab 04.
Concepts
- In your MVC, the line “import model…” and “import view…” should only ever appear in the Controller. The line “import controller…” should not appear anywhere in your Model or View.
- Basically, we want to turn all shapes into unit-sized entities centered on the origin, as this will most easily permit us to use affine transformations in drawing. For a circle, “unit size” seems pretty clear: unit radius or maybe unit diameter. For a strange shape, however (Dr. Wong draws something that looks like a squashed bug), “unit size” is less defined. Maybe it is the circle that most tightly encloses it? Maybe it is a circle whose radius is some average of the distances between the points around the perimeter and the geometric center? etc.
- It’s important to center your objects around the origin before you start transforming. Otherwise, transformations can easily affect them in drastic and undesired ways.
- Dr. Wong suggests trying to load and draw an image as part of Lab 04. Images can be tougher, as images’ origins are in their upper left-hand corners. Dr. Wong suggests using paintCfg(…) to reposition the image somehow to put it at the origin. Keep in mind that you’ll need to maintain the aspect ratio of non-square images when transforming them to unit size. Also, if your image contains a large whitespace border around the content, you may need to use test collision with a shape that is somewhat to substantially smaller than the rectangle of the image. Also, make sure the content of your images is centered within the image :D.
- Some of your shapes (including images) will have a non-identity “initial transformation” that will bring them to unit-size at the origin. Then, you can layer other transformations on top of this initial one to draw it wherever you need it. You should do this because you really don’t want to alter image data to bring it to an initial state: scaling images would lose resolution, etc. Instead, just composite multiple transformations to achieve your goal.
- Note that all of these transformations are reapplied during every draw; you never permanently alter your images or other shapes, but instead just set up the Graphics2D correctly each frame to draw through the transformations.
- If Dr. Wong or another staff member has not yet looked at your MVC design, he urges you to have it looked at to avoid losing points on HW03 and beyond.
After a 25 minute lecture, it looks like we’re now going to have work time for the rest of the lab.
Quotes
- “It’s like a never-ending battle, and I’m always losing.” — Dr. Wong on trying to adjust his class schedule year after year.
Resources
- Lab 04: http://www.clear.rice.edu/comp310/f12/labs/lab04/
Comments Off on Lab 04: Transforming Shapes | Labs | Tagged: hw04 | Permalink
Posted by iwa1
September 11, 2012
Dr. Wong began the lab by asking who had already implemented MVC in their HW02 solution. Most people responded that they had. It seems this lab will focus on MVC and miscellaneous tips regarding HW03.
Concepts
- There are two approaches to implementing adapters in the context of MVC. Dr. Wong reminds us that, in the end, it all comes down to decoupling the view from the model.
- Every single event that the View can generate (each individual button press, etc.), gets its own individual adapter to connect it properly to the model.
- There is a single IAdapter interface, with as many method specifications as are necessary to capture all of the events generated by the View.
- Dr. Wong advocates a mixed approach, wherein semantically related functionality is grouped into a single adapter, and a Controller may instantiate and distribute more than one kind of these adapters. For instance, adding a ball and clearing all balls are somewhat similar in that they both manipulate the set of balls. Therefore, an IBallAdapter interface could specify the addBall and removeBalls methods. On the other hand, methods for updating and drawing the balls (updateBalls, paintBalls) based on a Timer tick may reside in an IUpdateAdapter.
- To get started on HW03, Dr. Wong recommends to hold off on fancy painting (He seems to mean painting that somehow varies with time (something that changes shape or rotates / etc.)). We’ll get to that later. Also, until you have your Balls correctly using various Strategies, it is recommended to just hard-wire your dynamic class loader to skip the whole process of dynamic class loading, and instead to simply return an instance of some concrete Strategy.
- Many HW02 submissions were still called HW01 in Eclipse. This is because SVN branching will only affect the SVN folder names, whereas Eclipse knows the project name based on metadata stored in the “.project” file. Be sure to rename the project inside of Eclipse after branching; otherwise Eclipse will overwrite the copy of HW01 that is on your computer.
After 25 minutes of lecture, it appears that we’re now just going to have independent work time for the rest of the lab.
Quotes
- “Never delete something before its replacement works. In electrical engineering, they call that ‘make before break’” – Dr. Wong.
Resources
- Lab 3: http://www.clear.rice.edu/comp310/f12/labs/lab03/
- COMP-310 endorsed overview of MVC: http://cnx.org/content/m26104/latest/
- MVC Explained (in more detail, with picture): http://comp310.blogs.rice.edu/2012/09/11/mvc-explained/
Comments Off on Lab 03: MVC Implementation | Labs | Tagged: adapter, hw03, MVC | Permalink
Posted by iwa1
September 4, 2012
Concepts
- Don’t ever call paintComponent or new Graphics(…); because they are provided for you by Java’s graphics framework, which is exists before your code starts running and whose purpose is to make it easier for us to do graphics.
- Model-View-Cotroller[2]Design Pattern:
- The “Model” knows what your program is, and what its state is.
- The “View” knows how to display objects.
- The “Controller” knows how to tell a View to display a Model, and how to update the Model based on user input.
- The Model and the View never interact with each other; they only talk to the Controller.
- Use the MVC design pattern for Homework 2 even though it’s not required, because it will be required for Homework 3.
- WindowBuilder’s MVC will start the View instead of the Controller, which is wrong. Change the generated code to start the Controller instead.
- Balls (in Homework 2) move discretely, not continuously.
- If a ball passes the edge of your screen and bounces back and forth on the edge, it’s because you are making it bounce every time it is across a wall, rather than once per wall.
- How do you know where a ball would have been, if it discretely passes the edge? http://www.clear.rice.edu/comp310/f12/assignments/hw02/BallBounce.png
- Dr. Wong says “SVN Branch your Homework 1 code to use as the starting point for Homework 2.”
- Consider instead:
- Duplicate HW01 in Eclipse.
- Rename HW01 to HW02 in eclipse.
- Commit HW02 to SVN.
Quotes
- “Assume a spherical cow (in a vaccum).” – Dr. Wong (and peanut gallery)
- “I had an older brother, and to him, I provided the ‘punchingBag’ service. I didn’t know when he would call on that service; he could just walk up whenever he wanted and OOMPH” – Dr. Wong
Resources
- Animations: http://www.clear.rice.edu/comp310/JavaResources/animation.html
- MVC Design Pattern: http://cnx.org/content/m26104/latest/
- Copying a Source-Controlled Project: http://www.clear.rice.edu/comp310/Eclipse/Subclipse/copying/
Comments Off on Lab 02: Animation | Labs | Tagged: awt, hw02, MVC | Permalink
Posted by amw2